In the previous Kinect post we installed all the necessary SDKs, libraries and dependences and managed to read the stream of skeleton data inside Node.js with JavaScript. We did all this on a Windows machine as this is the most reliable way to communicate with the official Kinect SDK. Check out the previous post for more details on the installation process.
Here’s a quick demo of the finished gesture tracking prototype:
In this post we are going to pick up where we left off and broadcast the skeleton data from Node.js through web sockets for other computers and browser to use. In this instance we will subscribe to the feed from Chrome on a Macintosh. We will also look at basic gesture interpretation from this pure data.
Installing dependencies
In order to help us start and run a Node.js server we need to install the Express library. For the real-time data streaming through web sockets we need Socket.io. If you create a new folder and a new file called package.json and fill out the library dependencies section correctly then the npm install terminal command will automatically install everything for you:
{
    "name": "webclient-express-server",
    "version": "0.0.20",
    "description": "show skeletons in browser",
    "main": "index.js",
    "scripts": {
        "test": "echo \"Error: no test specified\" && exit 1"
    },
    "author": "Wouter Verweirder ",
    "license": "MIT",
    "dependencies": {
        "express": "~4.9.5",
        "socket.io": "~1.1.0”
    }
}
After entering npm install into the command line tool inside the project folder all the necessary libraries should be installed.
Broadcasting skeleton data
Let’s start building our skeleton data broadcasting Node.js application. First we load all the necessary library:
var Kinect2 = require('../lib/kinect2'),
    express = require('express'),
    app = express(),
    server = require('http').createServer(app),
    io = require('socket.io').listen(server);
We also need an instance of the Kinect 2 library:
var kinect = new Kinect2();Next, we call kinect.open() and in the same line we are also waiting for the response to be true in case powering up and accessing the Kinect sensor was successful:
if(kinect.open()) {
    // Kinect is ready!
}
Inside this condition we start our server:
server.listen(8000);
console.log('Server listening on port 8000');
console.log('Point your browser to http://www.webondevices.com');
The following expression will serve the index.html file inside the public folder. This step isn’t necessary as you can subscribe to the web socket data from html files that are not hosted on this server. Can be just a simple local page.
app.get('/', function(req, res) {
    res.sendFile(__dirname + '/public/index.html');
});
The final chunk of code is responsible for actually listening for received bodyFrames from the Kinect sensor which is one frame worth of skeleton data formatted into JSON. Inside the anonymous callback function we have the bodyFrame variable exposed which has the object. This is what we start sending through the web socket with the io.sockets.emit() command:
kinect.on('bodyFrame', function(bodyFrame){
    io.sockets.emit('bodyFrame', bodyFrame);
});
Finally, to kick off the whole process, we call the openBodyReader() function:
kinect.openBodyReader();Here’s how the final version looks like, all in one:
// The complete broadcast code

var Kinect2 = require('../lib/kinect2'),
    express = require('express'),
    app = express(),
    server = require('http').createServer(app),
    io = require('socket.io').listen(server);

var kinect = new Kinect2();

if(kinect.open()) {
    server.listen(8000);
    console.log('Server listening on port 8000');
    console.log('Point your browser to http://www.webondevices.com');

    app.get('/', function(req, res) {
        res.sendFile(__dirname + '/public/index.html');
    });

    kinect.on('bodyFrame', function(bodyFrame){
        io.sockets.emit('bodyFrame', bodyFrame);
    });

    kinect.openBodyReader();
}
If you save this document as broadcast.js, connect and power up the Kinect then enter node broadcast.js data broadcasting should start within a few seconds. Next task is to look at the front-end code that subscribes to this data.
Subscribing to the data
To interface with the web socket server we just created from the front-end we will use the socket.io javascript library:
<script src="https://cdn.socket.io/socket.io-1.3.5.js"></script>Once this is loaded, inside our front-end javascript file we initialise the socket by specifying the url and the port number:
var socket = io.connect('http://www.webondevices.com/');After this step we attach an event listener onto the socket instance which in our case listens for incoming messages named “bodyFrame”. This is the name we specified in the Node.js application when we sent the data. The second argument is the handler function to call when a message was received:
socket.on('bodyFrame', interpretData);Inside the interpretData function we can pass in the a variable which will contain the received message, which is the JSON formatted skeleton data in our case:
function interpretData(bodyFrame) {
    // Web Socket message:
    console.log(bodyFrame);
}
Interpreting gestures
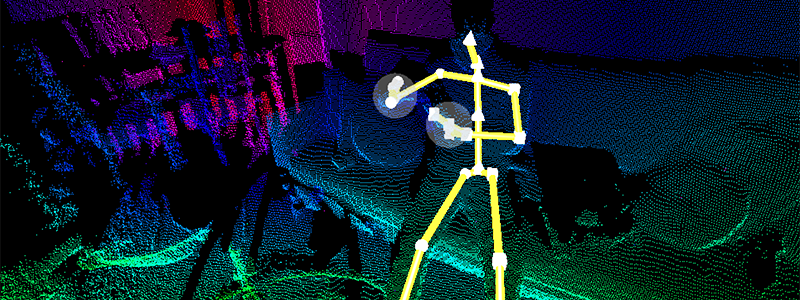
Let’s try investigating what the structure is inside this bodyFrame JSON object. At the first level we will find a property called bodies which contains an array of skeleton data for each skeleton tracked within the frame. This means that we can interpret gestures from multiple people standing in front of the Kinect camera the same time.
// Select the first body appearing in the data
var user = bodyFrame.bodies[0];
The selected user skeleton has a joints property which, again, contains an array with all the boy joints tracked:
// Left wrist
user.joints[6]
Here’s a list of all the joints:
- Spine base: 0
- Spine mid point: 1
- Neck: 2
- Head: 3
- Left shoulder: 4
- Left elbow: 5
- Left wrist: 6
- Left hand: 7
- Right shoulder: 8
- Right elbow: 9
- Right wrist: 10
- Right hand: 11
- Left hip: 12
- Left knee: 13
- Left ankle: 14
- Left foot: 15
- Right hip: 16
- Right knee: 17
- Right ankle: 18
- Right foot: 19
- Shoulder spine center: 20
- Left hand tip: 21
- Left thumb: 22
- Right hand tip: 23
- Right thumb: 24
Each of these joints have other properties too, like depthX, and depthY which will give you the 2D positional coordinates of each of the joints. You also have other properties like cameraZ to get distance from the camera too. With this we have 3D positional information from 24 joints of the body.
How can we use this to do basic gesture tracking?
One of the simplest gestures I can think if is a swipe in the air. Something you would do to swipe through an image gallery or carousel. Let’s analyse this movement in detail. We can say that the horizontal movement of your right hand becomes a “swipe left” gesture when the speed of the hand reaches a certain threshold into the left direction. The first first problem with this is that if your whole body moves from right to the left then it will still count as an increasing speed in your hand joint but your hand actually stands still relative to your body.
One solution to this is to rather than simply checking X coordinate and speed of the hand we calculate everything relative to the centre of the body which is your spine. For this, let’s first get the absolute position of the hand:
var rightHandPositon = user.joints[11].depthX;Then we get the absolute position of the spine:
var torsoPositon = user.joints[1].depthX;Then from this we get the relative position of the hand:
var rightHandRelativePosition = rightHandPositon - torsoPositon;Then we calculate the relative speed by checking how much the position has changed between each frames:
var oldspeed = rightHandRelativePosition;
var rightHandRelativeSpeed = rightHandRelativePosition - oldspeed;
Once we have this calculated you can simply add this value into an if condition and trigger the animation:
if(rightHandRelativeSpeed < -20)) {
    // Swipe left
}

if(rightHandRelativeSpeed > 20)) {
    // Swipe right
}
If you would like to make your code more reliable you can add a second condition to test whether the hand is above the waist line to consider it for gestures.